Simple U-Net Explanation
Written by Gemini 2.5 Flash on 2025-11-22. Do not reference it for factual information. Conversation: https://gemini.google.com/share/b8d82abc0f5d
Let's dive into the fascinating world of U-Net architecture! This is a powerful neural network especially popular in biomedical image segmentation. Imagine you have an image, and you want to precisely outline certain objects within it, like identifying tumor cells in a medical scan. U-Net helps you do just that!
We'll break it down piece by piece.
What is Segmentation?
First, let's understand what we mean by "segmentation." In simple terms, it's the process of dividing an image into multiple segments or regions. Each pixel in the image is assigned to a specific class.
For example, if you have an image of a cat and a dog, segmentation would label every pixel belonging to the cat as "cat" and every pixel belonging to the dog as "dog." The background pixels would be labeled as "background."
Why U-Net?
Before U-Net, many convolutional neural networks (CNNs) were great for classification (e.g., "Is this a cat or a dog?"). However, for segmentation, we need to know where the objects are, not just what they are. Traditional CNNs often downsample the image significantly, losing spatial information crucial for precise segmentation.
U-Net was designed to address this by combining information from both contracting (downsampling) and expanding (upsampling) paths.
The U-Net Architecture: A Detailed Look
The U-Net architecture gets its name from its characteristic "U" shape. It consists of two main parts:
- The Contracting Path (Encoder): This part is responsible for capturing context. It's similar to a traditional CNN.
- The Expanding Path (Decoder): This part is responsible for enabling precise localization.
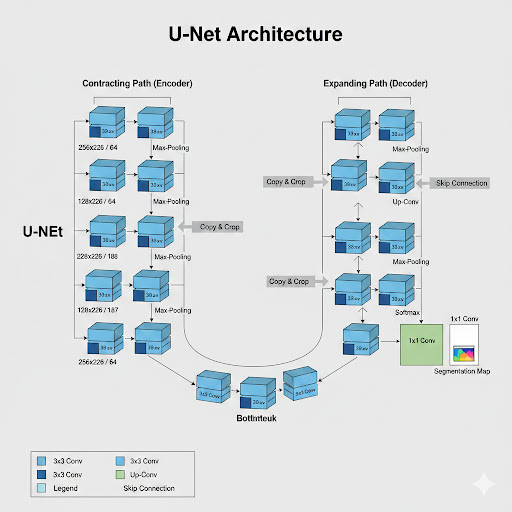
1. The Contracting Path (Encoder)
The contracting path is on the left side of the "U." It follows the typical architecture of a convolutional network:
- Repeated 3x3 Convolutions: Each step in the contracting path typically involves two 3x3 convolutional layers. These convolutions extract features from the input image.
- ReLU Activation: After each convolution, a Rectified Linear Unit (ReLU) activation function is applied. This introduces non-linearity, allowing the network to learn more complex patterns.
- 2x2 Max Pooling: After the two convolutional layers, a 2x2 max-pooling operation is performed with a stride of 2. This downsamples the feature maps, effectively reducing their spatial dimensions (e.g., halving the width and height) and increasing the number of feature channels. This process helps capture higher-level, more abstract features while reducing computational cost.
As we go deeper into the contracting path, the spatial resolution decreases, but the number of feature channels (depth) increases. This allows the network to learn more complex and abstract representations of the input image.
2. The Expanding Path (Decoder)
The expanding path is on the right side of the "U." Its goal is to take the learned abstract features and progressively upsample them to the original image resolution, while also incorporating fine-grained details lost during downsampling.
- Upsampling (Up-Convolution/Transpose Convolution): Each step begins with an upsampling of the feature map. This is often done using a 2x2 "up-convolution" (also known as a transpose convolution or deconvolution) with a stride of 2. This effectively doubles the spatial dimensions of the feature map.
- Concatenation with Skip Connections: This is where the "U" shape becomes crucial! After upsampling, the feature map is concatenated (joined) with a corresponding feature map from the contracting path. These are called skip connections.
- Why skip connections? The contracting path loses spatial information during downsampling. Skip connections bring back this lost fine-grained detail from the corresponding level in the contracting path. This allows the expanding path to recover precise localization information, which is vital for accurate segmentation.
- Repeated 3x3 Convolutions: After concatenation, two 3x3 convolutional layers are applied, followed by ReLU activations. These convolutions refine the features by integrating the upsampled and concatenated information.
The Bottleneck
At the very bottom of the "U," connecting the contracting and expanding paths, there's a "bottleneck" section. This usually consists of two 3x3 convolutional layers, similar to the other blocks, further processing the most abstract features before the upsampling process begins.
The Output Layer
Finally, at the end of the expanding path, a 1x1 convolutional layer is used. This layer maps the feature channels to the desired number of classes for segmentation. For example, if you want to segment three classes (e.g., tumor, healthy tissue, background), this layer will output a feature map with three channels. Each channel represents the probability of a pixel belonging to that specific class.
How it all comes together
Imagine tracing a pixel's journey:
- Downsampling: As the pixel information goes down the contracting path, it loses its precise location but gains rich contextual information about its surroundings and the larger structures in the image.
- Bottleneck: The information is highly abstract here, representing the most compressed and feature-rich representation.
- Upsampling and Skip Connections: As the information goes up the expanding path, it starts regaining its spatial resolution. Crucially, at each step, it's combined with high-resolution features from the corresponding level of the contracting path (via skip connections). This means the network can use both the rich context from the deep layers and the precise spatial details from the shallow layers to make its segmentation decision.
This combination of context and localization is what makes U-Net so effective for pixel-wise segmentation tasks.
Advantages of U-Net
- Precise Localization: The skip connections allow the network to achieve very precise segmentation boundaries.
- Small Dataset Efficiency: U-Net was initially designed for biomedical imaging, where training data can be limited. Its architecture allows it to perform well even with relatively small datasets, thanks to extensive data augmentation.
- End-to-End Segmentation: It performs segmentation in one go, without requiring multiple stages or complex post-processing.
Applications
While famously used in biomedical image segmentation (e.g., segmenting cells, organs, or tumors), U-Net has found applications in various other fields:
- Satellite Image Analysis: Identifying roads, buildings, or agricultural fields.
- Autonomous Driving: Segmenting pedestrians, vehicles, and road signs.
- Material Science: Analyzing microstructures.
Conclusion
U-Net is a brilliant piece of architecture that elegantly solves the challenge of image segmentation by skillfully combining downsampling for context extraction and upsampling with skip connections for precise localization. Its "U" shape is not just aesthetic; it's a functional design that has revolutionized pixel-wise prediction tasks in various domains.
Keep exploring, and you'll find even more fascinating ways neural networks are shaping our world!